We have ducklings (again!) & ghostly tales for Halloween
- Clare
- Nov 3, 2020
- 6 min read
Updated: Nov 10, 2020

We have had several days of wet and windy weather in Oxfordshire, and wellies have been the footwear of choice when we have ventured outside. However, the sun did shine through the rain long enough to make this beautiful double rainbow earlier this week.
Despite the poor weather, we have managed to get out and about and spent a few hours at the National Trust's Basildon Park and Greys Court earlier this week which helped to blow the cobwebs away and allowed the children to have a proper run around.
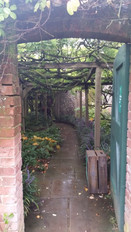
Greys Court is a really pretty Tudor country house that, unsurprisingly, has been used as a filming location for several dramas, including Poirot and Downton Abbey. The gardens are lovely and feature the remains of a medieval castle and a well-tended walled garden. However, the highlight for me is the beautiful, 130 year old wisteria which has created a jungle-like setting within a quiet corner of the garden as the moss covered branches have snaked their way around wooden supports. It is spectacular when in bloom.


I like to see what is flowering in other gardens and gain inspiration from other people's planting schemes. Also, whilst I do enjoy working in my own plot, it is sometimes nice to garden vicariously and enjoy the labours of others who are more green fingered than I am.
The view in our own garden is certainly less impressive, though we did have some very unexpected visitors mid week when the following mother duck waddled over to our living room window, closely followed by twelve cute little bundles of fluff, all looking for food. It seems late in the season to be raising a family of hungry ducklings but we will try to give them a helping hand. We have a sack of duck food on order and, in the meantime, have been offering defrosted frozen peas, oats and a little bread.


The flowers in the garden are fading though there are still enough around to feed to odd hungry bee:


The roses in the garden have been particularly floriferous this year and have bloomed on and off for months. A previous occupant clearly loved them, or simply thought they were a "must" for a pretty cottage garden, as varieties are dotted throughout the garden. I also added a few to the mix when we moved in, some of which were transplanted from our previous home. Mindful of the fact that we are planning another move in the not too distant future (and being disinclined to try to move the roses again - they are too big and suit the cottage too well!), I took some hard wood cuttings from my favourite varieties this week. I followed Monty Don's advice, as described below, though I planted my cuttings in pots so they will be easier to move:

As Halloween came and went, we also made more pumpkin soup and pie (it wasn't the prettiest looking pie in the world, but it tasted good!) and had a Halloween hunt for treats in the garden by torchlight.
As I looked back at the house while we wandered around the garden, it occurred to me that (despite being built around 1650), the house has quite a modern feel inside and has never seemed at all "creepy". Despite this, I do sometimes think about all the generations of families that have lived here before us. We know very little about the cottage's history, though little facts have emerged. It was once two cottages, for example, with families of seven and eight living in each small half. Now and again, we also discover something of interest in the garden, such as the remains of an old path buried under the soil or part of an old garden tool that somebody discarded long ago.
The superstitions and ghostly tales associated with old houses are in part attributed to the disturbing historic tradition of burying a sacrifice in the foundations of a newly erected building or bridge. These traditions are centuries old and are associated with a belief that the devil would carry off the first person to cross a newly constructed threshold. The sacrifice would strengthen the building and protect the inhabitants against evil spirits. There are terrible stories of people and animals being encased in the walls and foundations of old houses and churches, which make a literal statement out of the old saying that "every house has its skeleton". In British, Scandinavian and German folklore, the Church Grim is the ghost of an animal (often a black dog) which was buried in the foundations of a new church and which serves to wander around the churchyard at night offering protection. Seeing the grim is a bad omen and can foretell death.
If you are interested in reading more about these macabre traditions, the reverend and scholar Sabine Baring-Gould dedicated a chapter to the subject in his book "Strange Survivals: Some Chapters in the History of Man". This was published in 1892 but is still in print.
Getting back to happier subjects, if you are looking for more (non-pumpkin related!) autumn activities to try with the children, I have included another small selection of ideas below:
1. Grow your own oak tree - There are seeds aplenty at this time of year which can be used in a multitude of ways, from autumnal collages to pumpkin seed jewellery.
It can also be fun to simply plant the seeds and watch them grow. We started to grow a little oak tree in a sunny windowsill by immersing an acorn in water for 24 hours and then sitting it in the neck of a bottle filled with water. This is a great way for children to watch the transition of seed to plant, as the roots will grow down into the bottle. It also teaches a valuable lesson in patience as the process can take a while!
2. Make an autumn leaf lantern -

We used: Scissors, PVA glue and brush, greaseproof paper, circular lid and base of Camembert container, autumn leaves, kitchen towel.
(i) Collect a quantity of autumn leaves and press between layers of newspaper or kitchen towel for 24 hours to flatten and help them dry out.
(ii) Cut one piece of greaseproof paper to desired lantern height. NB When rolled into a cylindrical shape the paper should fit inside the lid and base of the cheese container (with a small overlap for gluing).
(iii) Cut a second piece of greaseproof paper to the same size as the first.
(iii) Arrange flattened leaves onto one piece of greaseproof paper and stick down with glue.
(iv) Place the second piece of greaseproof paper on top of the first, so the leaves are sandwiched between the two layers. Affix around the edges with glue.
(v) Press for about an hour to help flatten the paper (this stage is not vital, but we found it helped!).
(vi) Remove the "top part" of the cheese box lid (so you can get to the candle later).
(vii) Roll the greaseproof paper/leaf sandwich into a cylindrical shape and stick one end of the cylinder to the inside of the cheese box base. Do the same at the other end with the lid. You could also add a few dabs of glue to the point at which the two ends of paper overlap, to help keep the cylinder intact.
(viii) Place a tea light inside your lantern. NB It goes without saying, but you should never leave a candle burning unattended.


3. Make acorn/pine cone creatures - This is another activity which uses seeds and leaves collected on a nature ramble. We started off trying to make fairies, but most of our creations turned into Halloween monsters as the following examples show!

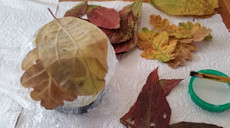
4. Make a leaf bowl - This can be a bit fiddly and does involve lots of glue, but is a good way to use up some of the masses of autumn leaves that can be found at this time of year.
We used: PVA glue and brush, Cling film, collection of autumn leaves with stalks removed, a "mould" to shape the leaves around (e.g. a small bowl), elastic bands.


(i) Press leaves between layers of newspaper or kitchen towel to help flatten and dry out (ideally overnight).
(ii) Cover chosen mould with a layer of Cling film.
(iii) Spread PVA glue over the Cling film and start to apply leaves around the mould to create a "bowl" shape, adding extra glue where needed.
(iv) Apply a further layer of glue over the surface of the leaves to ensure they are fully stuck down.
(v) Place another piece of Cling film over the leaves and wrap well to hold the leaves in place while the glue dries (I used an elastic band to help here).
(vi) Leave 24-48 hours and then carefully remove Cling film to reveal your bowl!


NB We used a couple of small jars for our moulds and, whilst this worked ok, I think a larger base would have made things easier. Several methods suggested using a 1:1 PVA:water mix (rather than neat PVA) and also recommended using a balloon as a mould as this negates the use of Cling film and can be gently deflated and peeled off the leaves after the glue has dried.
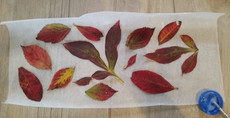
5. Leaf stained glass - if the above leaf bowls seem a bit too fiddly, we made this colourful collage by simply sticking leaves to a cardboard frame. By hanging it in a bright window, we were able to take full advantage of the lovely effect created by light shining through the leaves.

5. Make a paper plate hedgehog - Ending with a simple idea, this is a good one to get little ones practising using scissors. We folded the plate in half, used scissor cuts to create the spines and added details with pen and googly eyes prior to painting.


Comments